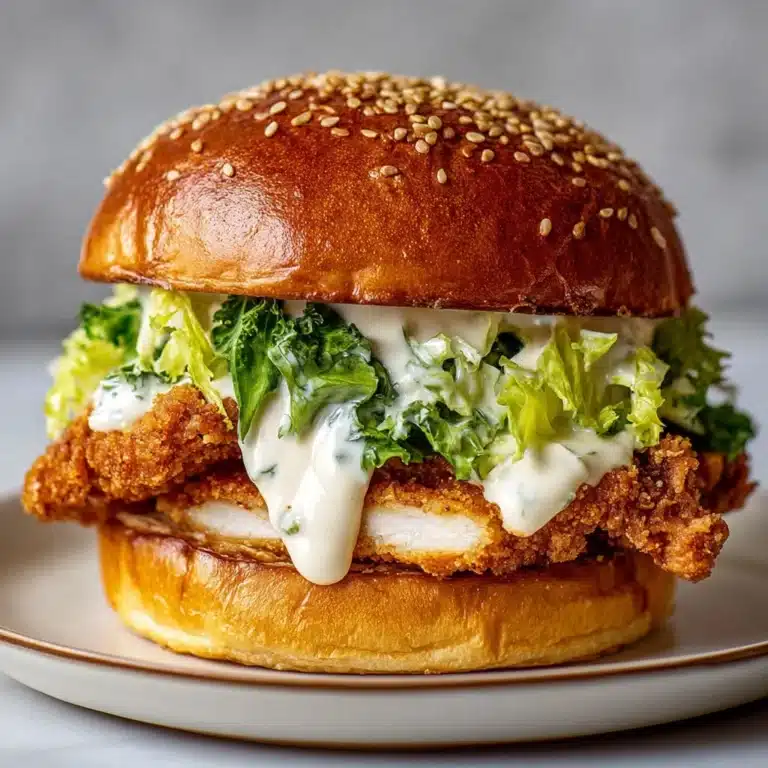
I absolutely love sharing this Korean Crispy Chicken Katsu Recipe because it perfectly blends crispy golden crust with juicy, tender chicken inside, all topped off with a tangy homemade katsu sauce that brightens every bite. Whenever I make this dish, it instantly feels like comfort food with a little exciting twist, and I can never resist serving it with fluffy white rice and fresh shredded cabbage for that perfect texture contrast. It’s simple enough to whip up any night of the week but special enough to impress guests, making it one of my go-to favorites for homemade Korean-inspired meals.
Why You’ll Love This Korean Crispy Chicken Katsu Recipe
What really gets me excited about this Korean Crispy Chicken Katsu Recipe is the incredible flavor combination that comes from the crunchy panko coating and the sweet-savory katsu sauce. The exterior crisps up beautifully without being oily, creating a satisfying crunch with every bite. Inside, the chicken stays moist and tender, which is exactly what I look for in a great fried chicken dish. The sauce, made with ketchup, soy sauce, and just a hint of garlic and onion powder, adds a familiar tang that complements the crispy chicken perfectly without overwhelming it.
Another thing I appreciate is how straightforward this recipe is to prepare, even if you’re new to frying at home. The technique of dredging the chicken in flour, then egg, and finally panko ensures the coating sticks well and fries up crisp every time. It’s truly a dish that feels impressive but doesn’t require a ton of fuss or exotic ingredients, which makes it perfect for weeknight dinners or casual get-togethers. Whenever I serve this, it’s always the first thing everyone reaches for, which makes me want to cook it again and again.
Ingredients You’ll Need

The beauty of this Korean Crispy Chicken Katsu Recipe comes from a handful of simple but purposeful ingredients. Each one plays a key role—whether it’s for texture, flavor, or color—that helps balance the dish perfectly.
- Chicken thighs or breasts: I prefer thighs for their juiciness, but breasts work well too and cook faster.
- Japanese panko bread crumbs: These are essential for that light, super crispy crust that sets this recipe apart.
- All-purpose flour: Coats the chicken for the egg wash to cling to, which helps the panko stick.
- Egg (beaten): Mixed with a bit of flour, it creates a thick, rich wash that makes the crust stick better.
- Vegetable oil: Perfect for deep frying to get that beautiful golden exterior without burning.
- Ketchup: The base of the savory, tangy katsu sauce that gives the dish its signature flavor punch.
- Soy sauce: Adds umami depth to the katsu sauce and balances the sweetness.
- Garlic and onion powder: Provides subtle aromatic warmth to the sauce.
- Sugar (optional): I like adding a touch to mimic the classic Bull-dog sauce sweetness, but it’s totally up to you.
Directions
Step 1: Begin by making the katsu sauce. In a small bowl, whisk together 4 tablespoons of ketchup, 1 tablespoon of soy sauce, and ⅛ teaspoon of garlic and onion powder. Taste it and add up to 1 ½ teaspoons of sugar if you want a slightly sweeter sauce similar to Bull-dog sauce. Set the sauce aside to let the flavors meld while you prepare the chicken.
Step 2: Prepare your dredging stations by placing flour in one shallow plate, the beaten egg mixed with a tablespoon of flour in a second plate for a thicker egg wash, and panko bread crumbs in a third. This setup makes it easy to coat the chicken evenly and efficiently.
Step 3: Season your chicken thighs or breasts with salt and pepper. Dredge each piece first in the flour, shaking off any excess, then dip it fully into the thickened egg wash. Finally, press the chicken firmly into the panko crumbs, making sure the coating adheres well and doesn’t flake off later.
Step 4: Heat about 2 inches of vegetable oil in a deep skillet or pot to 340°F (170°C). To check if the oil is ready without a thermometer, drop a few panko crumbs in—if they sizzle immediately, you’re good to go.
Step 5: Carefully add the breaded chicken to the hot oil. Fry one side for 4 minutes, then flip and fry the other side for another 4 minutes or until the coating is a beautiful golden brown and the chicken is cooked through (internal temperature of 165°F if you’re checking).
Step 6: Remove the chicken from the oil and place it on a wire rack or paper towels to drain excess oil. Repeat the frying process with the remaining pieces, making sure not to overcrowd the pan and to maintain the oil temperature around 340°F for the crispiest results.
Step 7: Slice the chicken katsu into 1-inch pieces and serve it immediately with the homemade katsu sauce, shredded cabbage, and steamed rice for a complete and satisfying meal.
Servings and Timing
This Korean Crispy Chicken Katsu Recipe makes about 2 generous servings, perfect for a cozy dinner or sharing with a friend. The prep time is around 10 minutes, mostly spent on setting up the dredging stations and mixing the sauce. Cooking takes about 10 minutes total, with frying and slicing, so the entire dish can be on your table within 20 minutes. There’s no extra resting time needed, which means you get to enjoy this crispy delight hot and fresh every time.
How to Serve This Korean Crispy Chicken Katsu Recipe

When I serve this Korean Crispy Chicken Katsu Recipe, I like to arrange the sliced chicken on a platter beside a mound of fluffy steamed rice and a pile of finely shredded cabbage. The fresh cabbage provides a crunchy, refreshing contrast to the rich, crispy chicken, and I often drizzle a little extra katsu sauce over the cabbage to tie the whole plate together. Sometimes, I add a few slices of pickled radishes or cucumbers for a tangy burst that really elevates the meal.
For garnishing, a sprinkle of toasted sesame seeds or a handful of finely chopped green onions always adds a beautiful pop of color and a subtle extra flavor layer. I also love serving this meal with a small bowl of miso soup or a light Korean-style cucumber salad to keep things bright and balanced. As for drinks, a crisp cold beer or a light, slightly sweet white wine pairs wonderfully with the richness of the fried chicken. I find sparkling water with lemon or iced green tea works well too if you want something non-alcoholic.
In terms of occasion, this dish is incredibly versatile. It’s a go-to for weeknight dinners when I want something quick but special, great for casual dinner parties where you want to impress without spending hours in the kitchen, or even as a comforting weekend lunch. I serve it hot or warm because that’s when the chicken crust is at its crispiest and most enjoyable to bite into.
Variations
I’m always experimenting with ways to switch up this Korean Crispy Chicken Katsu Recipe, depending on what I have on hand or dietary needs. For example, you can substitute the chicken thighs or breasts with pork cutlets for a more traditional “tonkatsu” vibe. If you want to keep things gluten-free, swapping the all-purpose flour for rice flour and using gluten-free panko crumbs works beautifully without sacrificing crispiness.
For a vegetarian or vegan spin, I’ve tried using firm tofu or seitan cutlets coated with seasoned flour, the thick egg wash replaced with a chickpea flour slurry, and the same panko crumbs for that irresistible crunch. The key is maintaining moisture inside while achieving that crisp crust outside, which this recipe framework supports nicely.
In terms of flavor, I sometimes add a dash of cayenne or Korean red pepper flakes to the breading for a subtle heat that pairs perfectly with the sweet-salty sauce. Another fun twist is baking or air frying the breaded chicken for a lighter but still crispy option if you want to reduce the oil usage. Trust me, the air fryer does a fantastic job at replicating that crunch with less mess.
Storage and Reheating
Storing Leftovers
If you happen to have leftovers (which sometimes never lasts long in my house), I store them in an airtight container lined with paper towels to absorb any excess moisture. Keep the container in the refrigerator and eat within 2 days for the best flavor and texture. The paper towels help prevent sogginess, which is the enemy of crispy chicken katsu!
Freezing
This Korean Crispy Chicken Katsu Recipe freezes quite well if you want to save some for later. I recommend freezing the cutlets on a baking sheet individually first, so they don’t stick together, then transferring them to a freezer-safe bag or container. They’ll keep frozen for up to 1 month. For best results, thaw them overnight in the fridge before reheating.
Reheating
To reheat and restore as much crispiness as possible, I always recommend using an oven or air fryer set to around 350°F (175°C). Place the chicken on a wire rack over a baking sheet to allow air circulation and heat for about 10-15 minutes until warmed through and crisp again. Avoid microwaving, as it will make the breading soggy and chewy, losing all that wonderful texture.
FAQs
What does Korean Crispy Chicken Katsu taste like?
It offers a wonderful contrast between a crunchy, golden exterior and a juicy, tender chicken interior, all balanced by the sweet, tangy, and slightly savory homemade katsu sauce. The overall flavor is comforting with a subtle Korean twist thanks to the soy sauce and seasonings.
Can I use chicken breasts instead of thighs?
Absolutely! Chicken breasts work well and cook faster, but be sure not to overcook them as they can dry out. I recommend pounding the breasts slightly to an even thickness to promote even cooking and keep them juicy.
Is it necessary to deep fry the chicken?
Deep frying is the traditional method and gives the crispiest results, but if you prefer, you can pan-fry with enough oil to come halfway up the chicken, or use an air fryer for a lighter option. The key is maintaining the right oil temperature so the crust crisps without burning.
Can I make the sauce ahead of time?
Yes, the katsu sauce can be made ahead and stored in the refrigerator for up to a week. It tends to taste even better after the flavors have melded, so I often prepare it a day in advance.
What should I serve with Korean Crispy Chicken Katsu?
I love serving it with steamed white rice, shredded cabbage or a simple salad, pickled vegetables, and a comforting soup like miso. Drinks like light beer, white wine, or refreshing iced tea complement the dish beautifully.
Conclusion
I’m truly excited for you to try this Korean Crispy Chicken Katsu Recipe because it’s one of those dishes that feels like a little crispy hug on a plate. Whether you’re cooking for yourself, family, or friends, it delivers on flavor, texture, and satisfaction every time. I promise, once you make this, it’ll quickly become one of your favorite ways to enjoy crispy chicken at home. So grab your panko, fire up your stove, and dive into this deliciously crispy adventure!
Print
Korean Crispy Chicken Katsu Recipe
Korean Crispy Chicken Katsu is a deliciously crunchy fried chicken cutlet coated in Japanese panko breadcrumbs and served with a tangy, savory katsu sauce. This quick recipe yields golden, juicy chicken with a perfectly crisp crust, making it an irresistible dish great for lunch or dinner.
- Total Time: 20 minutes
- Yield: 2 servings
Ingredients
Chicken and Coating
- 2 chicken thighs or breasts
- 1 cup Japanese panko bread crumbs
- ½ cup all-purpose flour
- 1 egg (beaten)
- Vegetable oil for frying (enough for deep frying)
Katsu Sauce
- 4 tablespoons ketchup
- 1 tablespoon soy sauce
- ⅛ teaspoon garlic and onion powder
- 1 ½ teaspoons sugar (optional)
Instructions
- Make Chicken Katsu Sauce: In a small bowl, combine ketchup, soy sauce, and garlic & onion powder. Taste the sauce and add sugar if you prefer a sweeter, more authentic Bull-dog style katsu sauce. Set aside to let flavors meld.
- Prepare the Chicken for Breading: Set up three plates—one with flour, one with the beaten egg, and one with panko bread crumbs. Mix a tablespoon of flour into the beaten egg to create a thicker egg wash which helps the breadcrumbs adhere better to the chicken.
- Season and Bread the Chicken: Lightly salt and pepper the chicken pieces. Coat each piece in flour first, then dip into the thickened egg wash, and finally press firmly into the panko breadcrumbs to ensure an even, crispy coating that won’t flake off during frying.
- Heat the Frying Oil: Pour enough vegetable oil into a deep pan or skillet to submerge the chicken cutlets and heat to 340°F (170°C) over medium heat. If you don’t have a thermometer, test by dropping in a few bread crumbs—the oil should sizzle immediately.
- Deep Fry the Chicken: Carefully place one chicken cutlet into the hot oil and fry for about 4 minutes on each side, or until the breading is golden brown and the chicken is fully cooked through. Fry in batches to maintain oil temperature and remove loose crumbs as needed.
- Serve: Slice the cooked chicken katsu into 1-inch thick pieces. Serve hot with the prepared katsu sauce alongside shredded cabbage and steamed rice for a complete Korean-inspired meal.
Notes
- Use chicken thighs for juicier meat, but chicken breasts work well too.
- Mixing flour into the beaten egg helps the panko adhere better for a crispier crust.
- Maintain oil temperature around 340°F to avoid burning the panko and ensure even cooking.
- Work in batches if cooking more than two pieces to keep the oil temperature consistent.
- Prep Time: 10 minutes
- Cook Time: 10 minutes
- Category: Main Course
- Method: Frying
- Cuisine: Korean